iPhone / iPad · First-time setup
Shadowrocket Quick Start
Follow this order: add your details → choose a routing mode → connect → verify. Check the interface at each step before moving on. If something fails, start with the most recent change.
This page covers the initial setup. For subscription management, field explanations, and update practices, see the Server Management Guide.
The screenshots below are from the App Store. Button locations and labels may differ from the current app, so check what appears on your screen. Read each step through before following it.
Step 01 / Get your connection details ready
Add a server or import an existing subscription
First, identify what information you have. For individual server parameters, use Add Server. For a link provided by your own service provider to update a server list, use Subscribe. These are different ways to enter information; don’t paste a subscription link into a single server’s address field. Keep the original details handy while entering them so you can check each value, especially the port, authentication fields, and protocol-specific options.
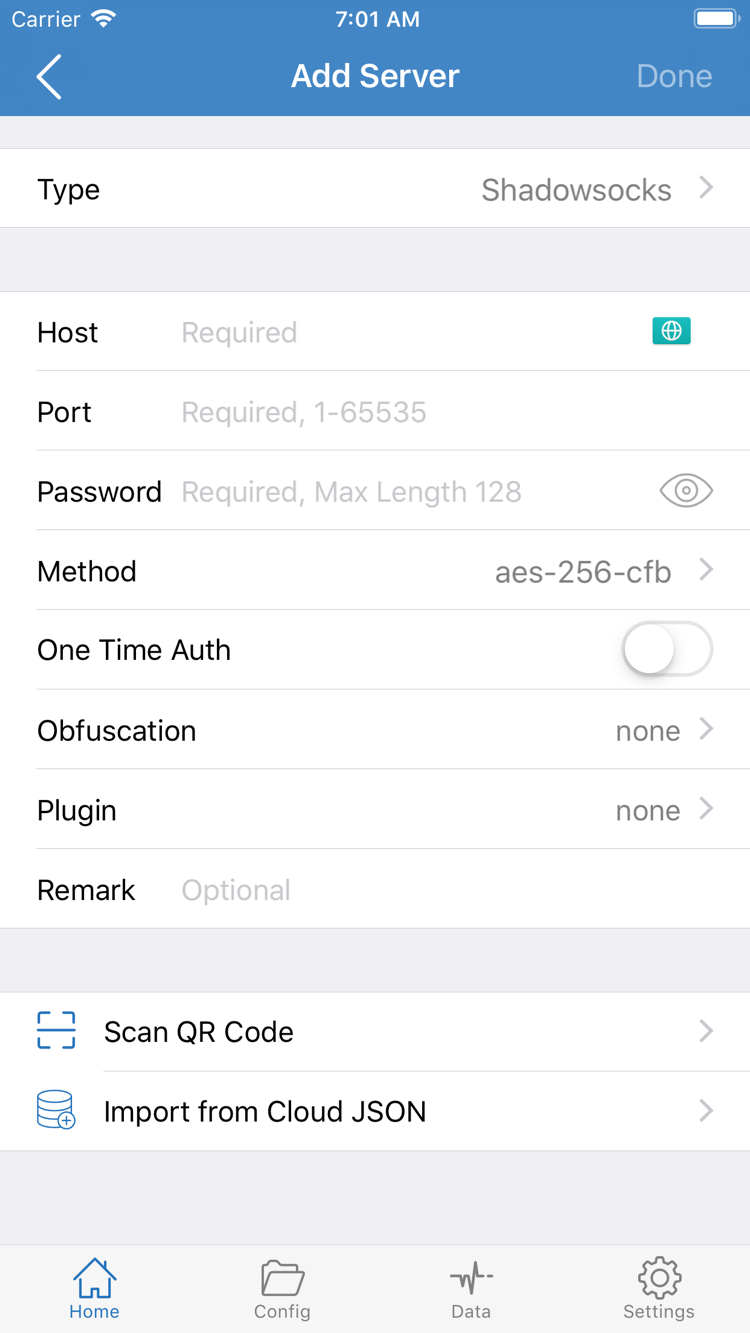
To enter details manually, find Add Server in the server list. Select Type first, then enter the address, Port, and relevant authentication details from your existing information. Available fields vary by Type: some configurations require Password and Method, while others also require transport or security settings that match the server. The address field in the screenshot is labeled Host; use the field names shown in your current app and the details you have. If a field isn’t visible, don’t put its value in a different field.
If you have a subscription link, open the Subscribe entry and paste the complete link. Save it, update it, then return to the server list and check that the expected items appear. Copy the entire link, including any query parameters. Spaces, line breaks, or a truncated ending can prevent it from being read correctly. Updating a subscription only retrieves existing details; it does not confirm that the service provider’s information is active. After importing, make sure the list contains items, then select one of your own servers. A saved subscription alone does not mean you’re connected.
If you have a QR code, look for Scan QR Code on the Add Server page. If you have a compatible configuration file, check the Import from Cloud JSON option and file format. These options are for different types of existing information; arbitrary text cannot be used with every import method. For your first setup, use only the method that matches what you have. Save it, check the list, then continue. For field-by-field details and tips on organizing multiple subscriptions, see the Server Management Guide.
Step 02 / Choose how to handle traffic
Choose a Global Routing mode
Once the server is in the list, don’t start switching the connection on and off. Go back to Home, find Global Routing, and check the current mode. This setting determines how traffic is handled after a connection is established; it’s separate from choosing a server. Decide whether you want traffic routed by a configuration file or handled uniformly. That gives you a clear basis for checking the results later.
The three common modes are Config, Proxy, and Direct. Config applies the rules in the current configuration file to different requests. Proxy is useful for temporarily checking how traffic behaves when routed through the selected server. Direct lets you check direct connections. For everyday rule-based routing, start with Config and make sure the intended configuration file is in use. If you change modes, previous test results may no longer apply, so test again.
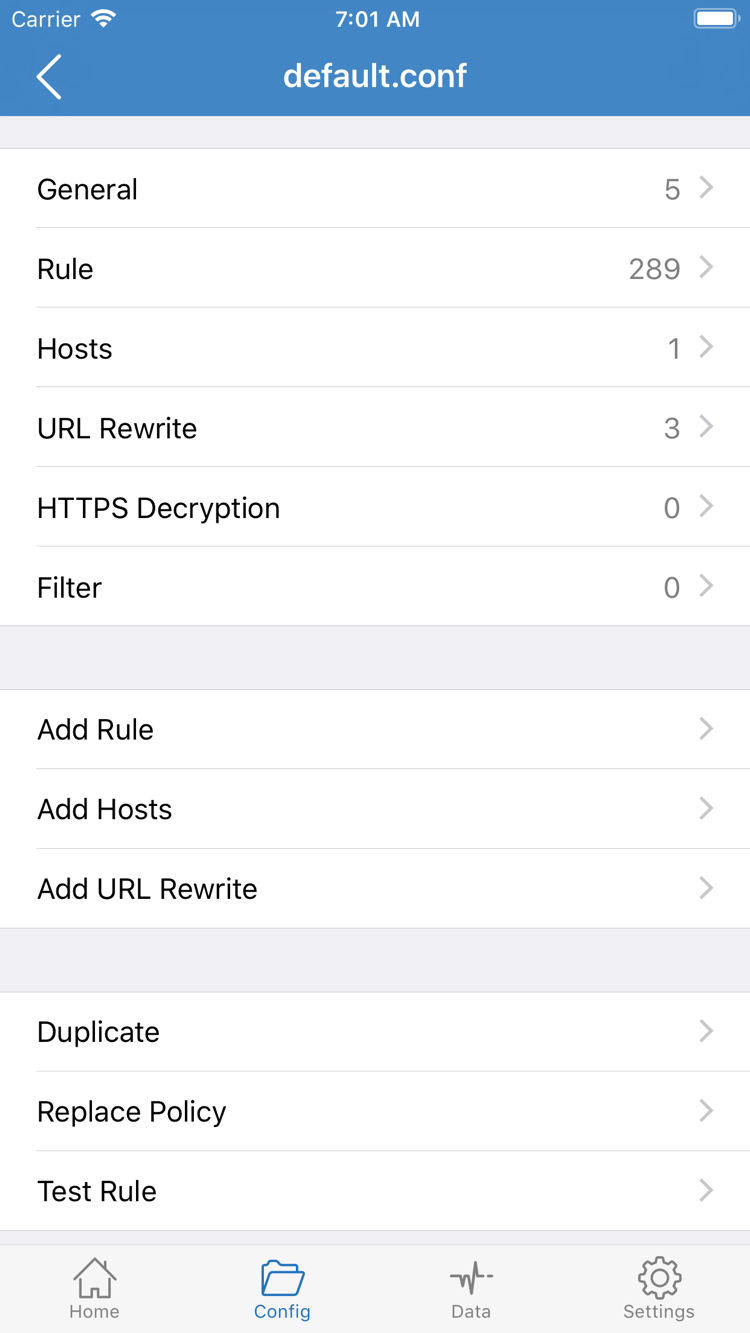
If you choose Config, open the configuration area and check that a rules file is present and organized as expected. In the official screenshot, General, Rule, Hosts, URL Rewrite, and HTTPS Decryption are separate sections. For now, just locate Rule; you don’t need to edit each section to make your first connection. Use Add Rule to add a rule, but first decide what it should match and how that traffic should be handled. For example, DOMAIN-SUFFIX,example.com,PROXY illustrates the rule syntax; example.com is a sample domain, not a destination to copy.
First connect and test with the configuration you already have, then decide whether any rules need changing. If you edit several rules at once, it will be hard to tell whether a problem came from the server details, routing mode, or match conditions. See the Glossary for rule keywords such as PROXY and DIRECT, and how rule order works. For managing and backing up configuration files, see the Server Management Guide. Once you’ve checked Global Routing, return to Home and connect.
Step 03 / Connect
Turn on the connection switch on Home
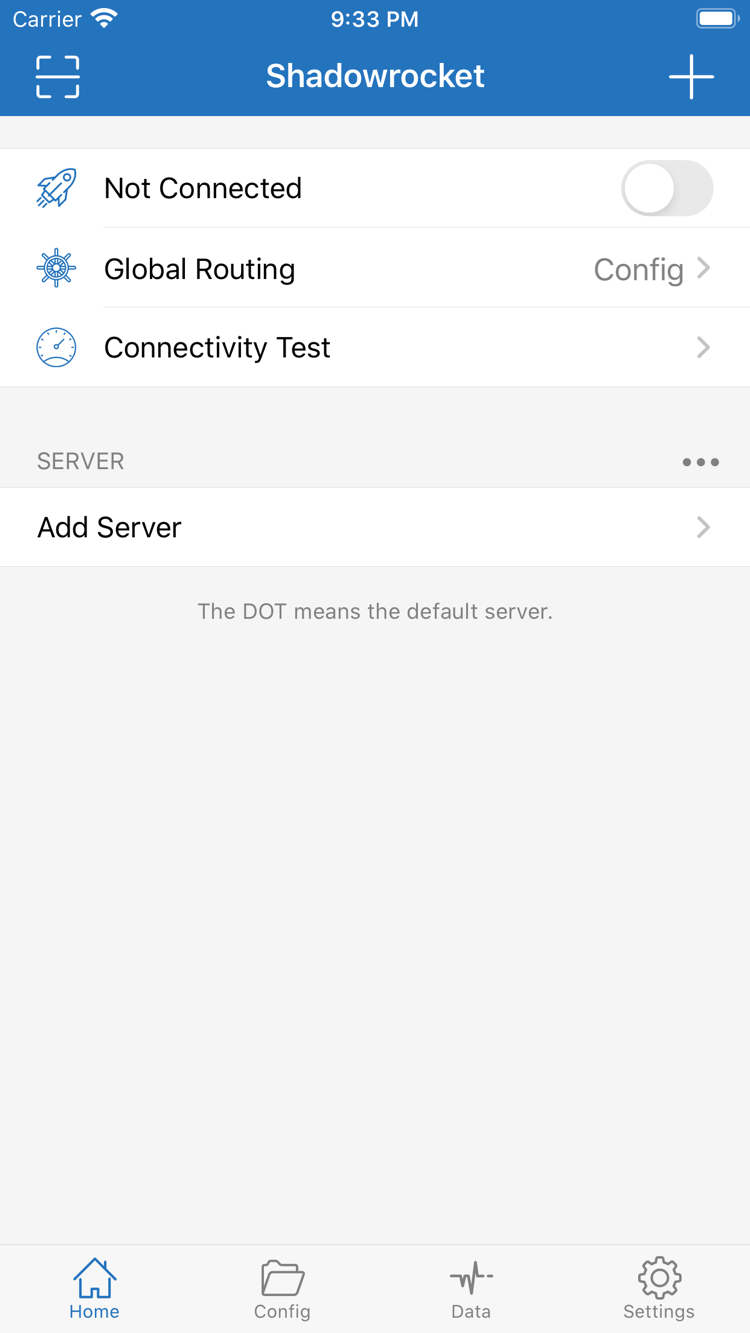
Return to Home. Check that the server you just verified is selected, then confirm Global Routing is set to the mode you expect. The Home screenshot can help you locate the connection switch at the top, the SERVER section, and Connectivity Test. Not Connected in the screenshot reflects its status at the time; it is not what you should expect to see after following these steps. Check the live status on your device.
Once you’ve confirmed the selected server, turn on the connection switch at the top of Home. The first time you connect, the system may ask for permission to add a VPN configuration. Read the system prompt and follow the instructions to allow the app to request a connection. This system-level prompt does not confirm that your subscription or server details are correct. After granting permission, return to Shadowrocket and check whether the status on Home changes. Wait for the connection process to finish before testing.
If the switch turns off again shortly after you turn it on, don’t keep tapping it. Check that a server is selected, your details are complete, and your current network is available, then follow the troubleshooting steps in Step 05. If Home shows that you’re connected, that only confirms a change in connection status; it doesn’t prove that a destination will work as expected. Keep the same server and Global Routing mode for the next connectivity check and real-world test. This helps distinguish “connected” from “working as expected.”
On iPad, follow the same steps to find Home, SERVER, Global Routing, and the connection switch. The layout may differ from iPhone, so don’t rely on exact screenshot positions. For your first setup, note the selected server and routing mode so you can reproduce the same conditions if a test fails. For information about getting the app and opening it for the first time, see the iPhone guide or iPad guide.
Step 04 / Check connection status and real-world results separately
Use Connectivity Test to check whether the connection works
Once the connection is stable, return to Home and use Connectivity Test. Note the conditions before starting: which server is selected, whether Global Routing is set to Config or Proxy, and which network the device is using. Consider the results alongside these conditions rather than remembering only whether the test passed or failed. If you’ve just changed a server or rule, run the test again so you don’t mistake an earlier result for the current one.
After the connectivity test, open the destination you actually need and check how it works. Connectivity Test checks connectivity for its own test targets; it cannot predict the results for every app or website. This matters especially in Config mode, where different requests may match different rules. A result for one test target doesn’t mean every destination will be handled the same way. If a destination doesn’t work as expected, note the destination, the current Global Routing mode, and whether custom rules are in use. Then check the relevant Rule instead of re-entering all your server details.
To narrow down the issue, you can temporarily switch to Proxy for comparison, then restore your original Config mode after testing. If the results differ between the two modes, focus on the configuration file, rule matching, and rule order. If neither mode gives the expected result, recheck your server details and connection status first. Direct can help you check direct-connection behavior, but results in Direct mode are not evidence of traffic being handled by the selected server. Retest after each mode change.
Try to change only one variable at a time. For example, keep the server and network the same while changing Global Routing, or keep the routing mode the same while rechecking just one server field. This makes it easier to identify which change affected the result. For explanations of rule keywords, test results, and common statuses, see the Glossary and Troubleshooting. If everything works as expected, your initial setup is complete; there’s no need to change additional Settings options for now.
Step 05 / Check each layer, from input to system settings
Troubleshoot connection problems in order
Start by checking the information you entered. For a manually added server, compare Type, address, Port, authentication fields, and any Type-specific options. Check numbers, capitalization, and spaces at the beginning or end. For a subscription, confirm the link is complete, the update succeeded, and the server list actually contains items. An empty list is different from a populated list that won’t connect: first check the link and update result; then check the selected server and its parameters. For a step-by-step checklist when a subscription update fails, see the subscription update troubleshooting guide.
Next, check what’s selected. The intended server should be selected in the SERVER section on Home; adding, saving, or updating details does not select a server for you. Check whether Global Routing is set to Config, Proxy, or Direct, and interpret the test results for that mode. If a destination fails only in Config but works in a Proxy comparison test, check the Rule in the current configuration file. Don’t assume every problem is caused by the subscription. If you’ve just changed a rule, restore a known state first, then change one rule at a time.
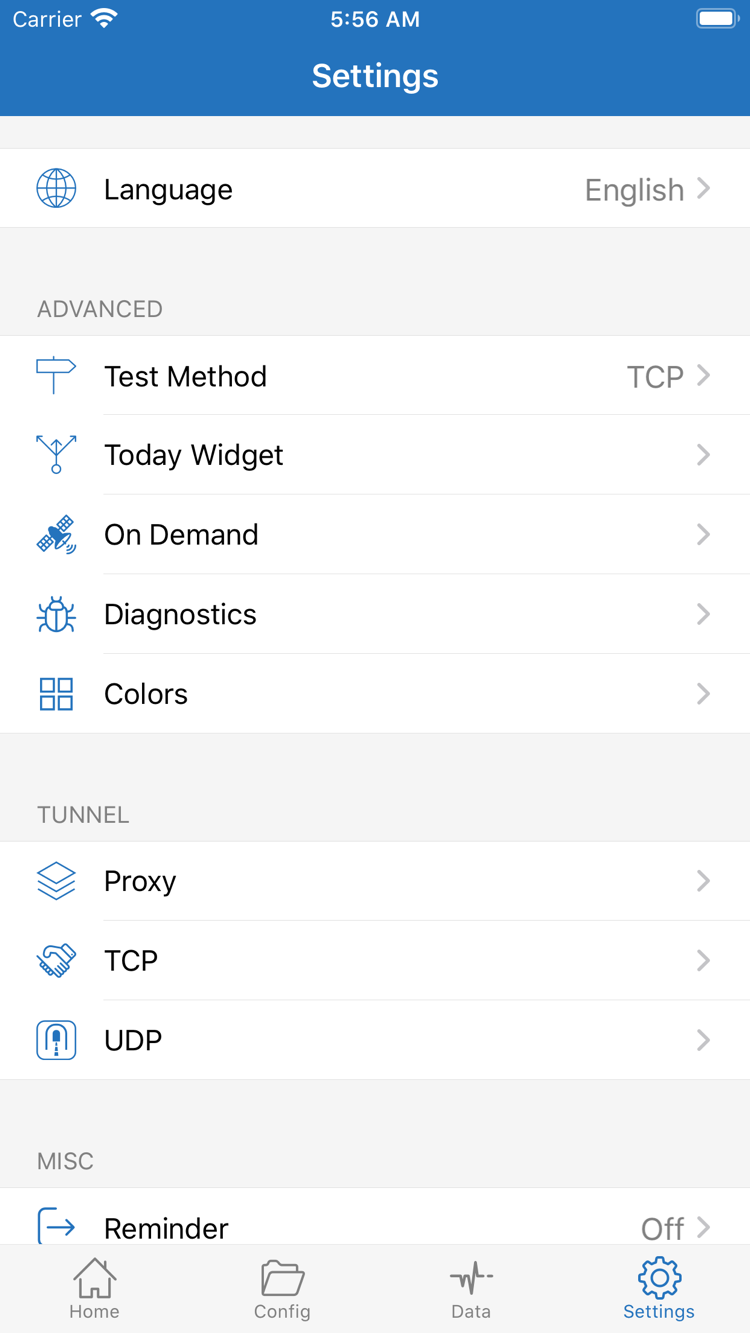
Finally, check the system connection status and Settings. Confirm the Home switch status and that you completed the system authorization prompt. Then review the relevant items under Settings, such as On Demand, Diagnostics, and Test Method. On Demand affects connection behavior under qualifying conditions. If you’re unsure how the existing rules apply, note the original settings before running a comparison test. Diagnostics can offer useful clues, but assess them alongside the Home status, real-world results, and your own server details. Other categories shown in the screenshot are not a first-connection checklist, so you don’t need to change them all.
If results differ after switching networks, record the test results for each network. Avoid changing server details at the same time as switching networks. If your details have changed on the provider’s side, check the latest information they supplied; this site only explains where to enter and check details in the app. After troubleshooting, restore the server selection, Global Routing mode, and any Settings items you changed to the state you intend to use day to day. Then rerun Connectivity Test and check the destination itself. For troubleshooting steps organized by symptoms, see Troubleshooting.
After the initial setup
Keep a record of your working configuration
Note what type of details you used, which server you selected, your Global Routing mode, and how you verified the connection. When updating a subscription or changing a Rule later, keep the working settings as a baseline and change one item at a time. For managing multiple subscriptions, latency tests, or removing old entries, continue to the Server Management Guide. To look up interface terms, use the Glossary.